Dahlia Tuber Care & Growing Tips
What do I do when my dahlia tubers arrive before planting?
If you are not ready to plant, keep your dahlia tubers in the packing medium they came in and store them in a cool, dark place (38-45 degrees and 85-95% humidity is ideal). You can also go ahead and pot them up so they can begin growing indoors. If you do this, be sure the soil is moist but not soaking wet. Remember dahlia tubers don’t like wet feet.
When do I plant my dahlia tubers?
You want to check the date of your last frost and then ensure the soil is 55 degrees. A good rule of thumb is when it’s safe to plant tomatoes, it’s safe to plant your tubers. Another general saying is around Mother’s Day or when the lilacs bloom in my neck of the woods (I live in zone 8a in Whatcom County in WA state).
Figure out what type of soil you have. If your soil is sandy or sandy loam, you might be able to get away with planting earlier; whereas, if you have clay soil, you might want to wait. In our area, we can get a lot of rain in April, so if I have clay soil, while my neighbor down the road has sandy loam–they might be able to plant without their tubers rotting. On the other hand, my clay soil mixed with rain wouldn’t be a great idea.
How do I begin with dahlia tubers?
The best is to have a soil test done. This will tell you what to put in your soil and what not to put into it. The best time to do this is in the fall as it will provide the most accurate readings. If you have not done a soil test, then determine whether your soil is sandy, clay, rocky, silt, or a mixture (see above as to why).
You might see other flower farms saying to amend with a heavy dose of compost as dahlias are heavy feeders. I have also heard long-time dahlia farmers saying they add lime every year. Here is the conundrum: if you don’t know what your soil is like (via a soil test), you won’t know if adding that compost or that lime will actually cause reverse effects on your plants and tubers. If the best soil test you can get is one from the hardware store, then do that this year and invest in a soil lab test after the season is over.
Have a list of your varieties and make note of how tall they grow. You don’t want to plant a 3-foot dahlia next to a five-foot as it will block the sun from the 3-foot plant.
Find a spot where you get full sun…dahlias LOVE the sun.
Make a map where every variety will go and have a system (stake, tag, etc) to keep track of them while they are in the field.
Prepare the soil about two weeks before you plan to plant. This means adding amendments like compost if needed.
Dig a hole for each dahlia tuber or do a trench (this depends on how many you will plant).
If you have a large number of dahlia tubers, put your T-posts or another method of corralling. If you have a small number, have your sticks ready for each spot you plant a tuber. You will put in a stick (bamboo stick or T-post) to serve as support for later in the season.
At the time of planting, add a small amount (1-2 Tb) of fertilizer (I use Nature’s Intent) or you could use Bone Meal as this helps with tuber development. **I stopped using Bone Meal as it attracts canines to dig up tubers as they smell the bone meal. Another word of caution about Bone Meal is the added phosphorus added to your soil. If you have heavy clay soil, it would be advisable to stay away from Bone Meal.
Plant your dahlia tubers 4-6 inches deep.
Cover tubers with 4-6 inches of soil.
What about spacing?
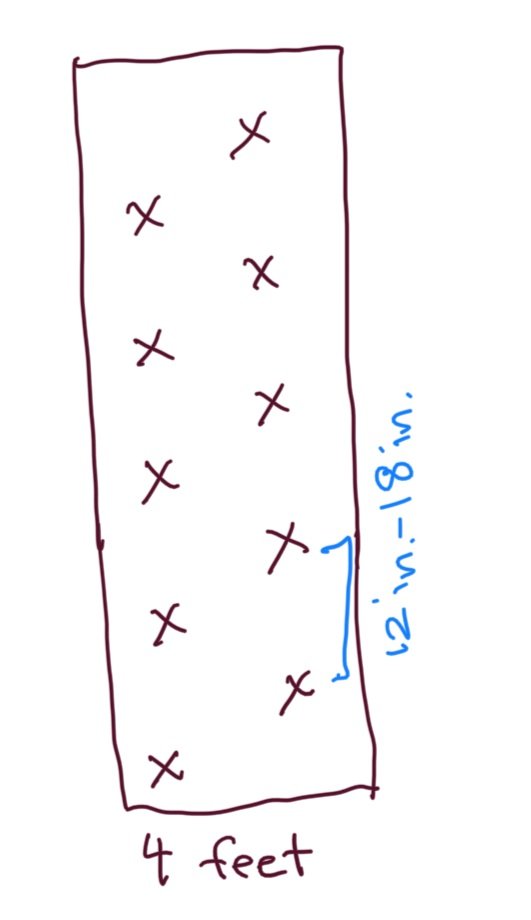
I plant with rows of two. Each row is around 4 feet wide. I then stagger my dahlias in the two rows.
I have planted my dahlias anywhere from 24 inches apart to 12 inches. I personally think 18 inches is a happy medium. If you have space to give them more space, the happier they will be and less prone to disease and powdery mildew. You could also give your larger dahlias more space, while your smaller ones the 12-inch spacing.
Just be sure to give at least five feet of space for your rows. Remember they get large and grow into the rows.
What about watering?
In the PNW, our soil is 99.9% wet or moist at the time of planting (00.1% is 2023 season). This means when we put our tubers into the ground, we do not water until they a good majority of the plants have broken the soil. Tubers don’t like to sit in a cold, wet underground as this can lead to rot. If your soil is dry when planting, add enough water to make the ground damp. If after planting you don’t see rain for a while, then water to moisten the soil.
Throughout the season and once you see plants emerging, you can water. In the PNW we don’t really have to water in May or June, since we get enough rainfall. However, I do set up water tape to water consistently 3 times a week once the plants begin to grow. I water in the morning time before the sun has begun to beat down and water for a good 2-3 hours. Again, I am using drip irrigation, so it is much more efficient (I recommend everyone use drip irrigation, it will save you time, money & the environment).
**Addendum: Beginning in the 2023 season, I have begun pulse irrigation/pulse watering. This means I have my drip tape set up to a water timer, which is set to turn on at 6-hour intervals at 10 minutes each time. I have learned more about this from Winkie’s Dahlias
What about amendments and pests?
I will use a fish fertilizer in May & June and cut it off by mid-July. I do a foliar spray of diluted fish fertilizer (this does not have phosphate in it) in the evening every two weeks. The nitrogen in the fish fertilizer gives the plant nutrients to grow. We cut it off by mid-July because nitrogen only helps with the plant growth, not the bloom growth.
Some use a fertilizer low in nitrogen and higher in phosphorus after this point or simply use compost tea. Another reason to check on your soil test as a lot of soil in PNW can have high phosphorus levels because it gets locked up in the soil. So adding more phosphorus isn’t always the best idea.
August is when blooms really take off, and I pay more attention to watering and checking for pests. I steer away from pesticides (organic or non-organic–doesn’t matter) and try other methods.
I do use Sluggo at the beginning when dahlia plants first emerge, as we have a plethora of slugs in the PNW. We also get a lot of earwigs.
What about pinching, and disbudding?
When your plants are about 12 inches tall and have three sets of leaves, it is good to pinch them.
Dahlia size Date to pinch Leave this many pairs of leaves
AA & A June 15 2
B June 25 3
BB June 20 to 30 4
Miniature June 15 5
Ball June 20 to 30 4-5
All others June 15 5
After I have pinched my dahlia plant and it begins to grow, I will look for the main bud on the growing stem and remove the two side buds. Every bud will have the terminal bud and two side buds. Simply remove with your fingers.
What do I do when they bloom?
Dahlias take around 95-120 days to bloom, depending on the variety & size. Most dinnerplates take much longer to bloom. Once I see blooms and I can begin harvesting, I like to cut deep. What this means is I go down about three leaf nodes and cut directly above the third set of leaves. I want long stems (about 15-18 inches long). Don’t be afraid to cut deep. Dahlias will keep sending out shoots with new flowers the more you cut. Also, by cutting more stems, this signals to make more tubers as well.
Cut in the early morning hours, as the plants have been hydrated from the cooler temps overnight. You can also cut in the evening hours; but, generally, avoid cutting in the middle of the day when the plants are most taxed and the sun is at its peak.
There is different thought on what type of water to store them for optimum vase life. I have read and done both hot water and cool water. I think more important is a clean vessel (think, would I drink out of this?), with clean water and cutting in the morning hours. Then, store the dahlias in a cool to a colder environment.


